Total cost for both these mods was around $15 and no modifications to the tractor were required so they are easilly reversible. My particular process requires some welding but with some more thought, I am sure the same configuration could be accomplished as a bolt together assembly.
I didn't like the fact that the stock airfilter location on my Jinma 284 blocked access when I tried to clean the radiator screen. I do this quite frequently when performing work that puts a lot of dust and debris in the air such as brushhogging. I also didn't like that the airfilter and the frame that supports it disrupt the airflow into the radiator. With that in mind, I relocated the airfilter to a spot above the intake manifold and injector pump. This modification requires one piece of strap/bar steel and one section of rubber pipe approximatly 4" long. You can cut a small section of the original rubber air hose for this but I opted not to do this in case I ever decided to return the filter to it's original location. Instead I used a small rubber pipe joiner used to connect 2 pieces of 1 1/2" PVC pipe using hose clamps. They are usually available at most any hardware store in the plumbing section.
1. Remove the hoseclamps and the air hose that connects the filter to the intake manifold.
2. Unbolt the airfilter holder from the support bracket in front of the radiator.
3. Remove the airfilter support bracket from in front of the radiator and replace the mounting hardware in the holes in the frame. This is an excellent time to clean and inspect the battery ground terminal connection to the frame.
4. Remove the single bolt that holds the fuel filter bracket in place.
5. Using a piece of 3/16" X 1" wide strap approximatly 10" long, drill a hole the same size as the fuel filter mounting bolt approx 1" from the end. If you use thicker strap, you may need a new, longer bolt to re-mount the strap and the fuel filter to the existing engine bracket.
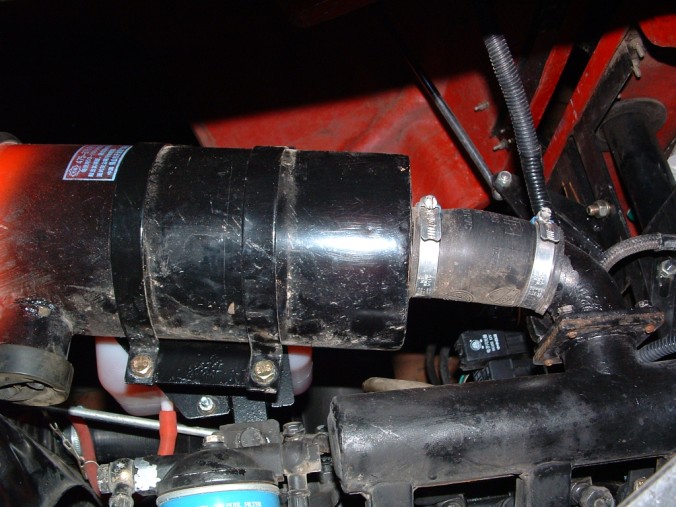
6. Install this piece of strap vertically on the inside(valve cover side) of the bracket that holds the fuel filter assembly.
7. Using the short hose coupling, place the air filter(with it's holder/bracket attached) in place above the fuel filter so the bracket contacts the strap installed in step 6. Because of the distance between the intake manifold and the radiator, the filter will not set horizontal and must be elevated at the front to a certain angle to allow filter removal without disassembly of the bracket. This coincidentaly is about the same angle that the inlet to the intake manifold is at. The new filter location appears to come straight off the intake manifold pipe.
8. Mark the bracket location on the strap or tack weld it in place while every thing is lined up properly.
9. Remove the strap from the fuel filter mount and the air filter from the bracket and finish welding the air filter bracket to the strap.
10. Re-install the strap to the fuel filter bracket and place the airfilter into the bracket and tighten it's straps and the hose clamps on the airline and you are done.
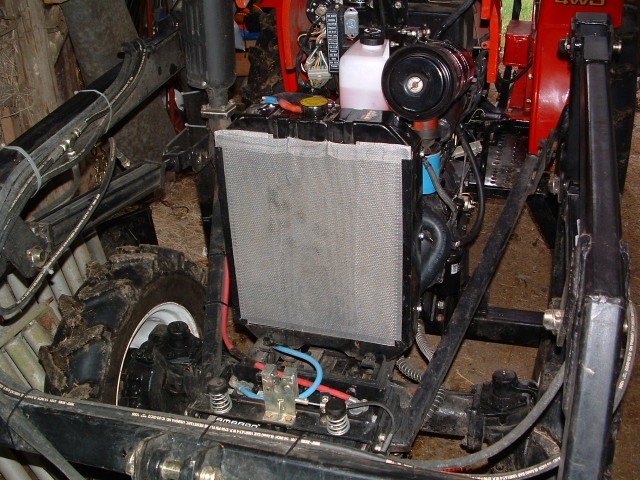
This modification only takes about an hour and is easy to remove(single bolt at the fuel filter and one hose clamp on the air line) to work on the injectors, injector pump or cylinder head. You can also easilly access the the radiator screen for cleaning and there is no interruption to the air flow into the radiator.
I live in a relitively cool year round climate so under hood temps are not a real problem for me. Drawing air from the new location is certainly no worse than where it was located originally as I am sure hot air from the fan is re-circulated over the top of the radiator past the stock filter location and back into the radiator. If air temp is a problem where you live, the original air hose could be used to supply air to the air filter from outside the engine compartment.
by Ron M
Coolant overflow tank:
The stock Jinma's do not come with a coolant overflow tank. I am carefull not to dump things on my land that don't really belong there so this bothered me. Coolant systems are also more efficient when they are full of liquid and running under pressure. Without a recovery/overflow tank, the system will dump coolant on the ground when it reaches the cap release pressure(15PSI). In the stock Jinma, there will always be air on the top of the radiator, drawn in through the overflow hose as the system cools after engine shutdown.
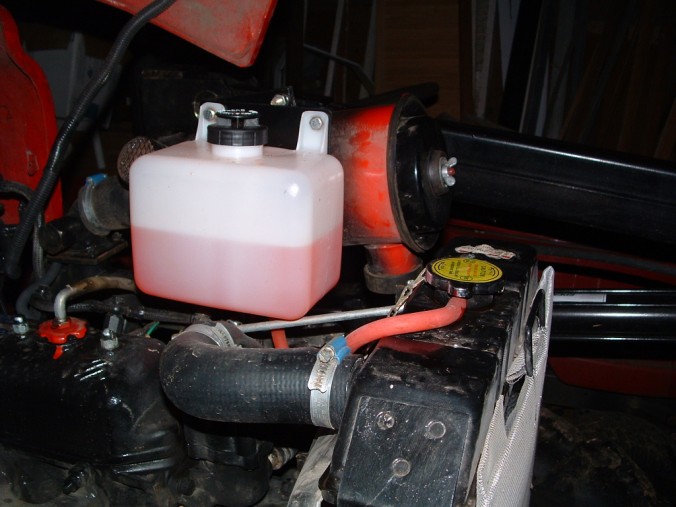
I had two problems to solve in completing this modification. 1. Where to find a tank the correct size to fit the space available and at a reasonable price. 2. Where to locate the tank at the correct height in the limited space available. I was in my local Napa Autoparts store on another errand when I came across a small molded overflow tank about 5"tall X 4"deep X 6"long with molded in mounting points. The Napa P/N is 730-4514 and it cost less than $10. The airfilter re-location wound up providing an excellent location to mount the tank. I attached the tank to the piece of strap that holds the airfilter bracket with a piece of 18GA sheet metal cut to reach all 3 tank attach points. With the tank attached to the sheet metal plate, I held it up against the strap at the desired height and marked the sheet metal where it met the strap. I disassembled the air filter bracket and removed the sheet metal from the tank. I Then welded the sheet metal to the vertical strap at the location I marked. I then spray painted the entire assembly and re-assembled the tank and airfilter to the bracket and re-installed it as one assembly on the tractor.
This mod also took about one hour and the whole assembly can quickly be removed for maintenance by removing a single bolt, hoseclamp and disconnecting the hose that connects the tank to the radiator. As long as there is coolant in the tank, any air in the system that finds it's way to the top of the radiator will be forced into the tank when the system heats up and only fluid will be drawn back in when the tractor cools.
As you can see, the end result of these two simple modifications leaves an unrestricted air path into the radiator and no coolant on the ground.