COOLANT RECOVERY SYSTEM By Norm Solari |

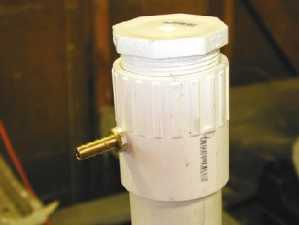
After moving my air cleaner to an outside position, the whole battery bay opened up leaving a lot of room. I wanted a coolant recovery system on my tractor and, since moving the air cleaner out of the battery bay, I now had the room to install one. I experimented with an automotive type available from auto supply stores however, since I modified my hood to tilt forward, I had peculiar mounting requirements so I decided to build my own system. I could have mounted the automotive type (or a custom tank) where the air cleaner was originally located but that would have put it directly over the battery which I did not like. With the air intake hose now gone, there was a perfect place on the left side of the radiator to mount a custom built tank. I built the tank out of 1 ½ inch white plastic pipe. I cut a piece 18 inches long. (I determined the length through trial and error. My first one was 12 inches long however, it was just adequate under normal running conditions. When I tested it at temperatures exceeding 90 deg 'C', the tank would not hold enough coolant.) The 18 inch tank allows for about 8 ounces in the bottom when completely cold and will still accept enough coolant when hot. On one end I used a standard glue-on end cap. On the other end, I used a glue-on end piece that accepted a screw-in plug. The end with the screw-in plug is the top and the plug can be removed to check coolant level. Prior to gluing the bottom cap on, I located the center and drilled and tapped it to accept a ¼ inch barb with 1/8 inch pipe thread. Once the ¼ inch barb was installed, I glued both end pieces on the main pipe. I then located a point on the upper cap just below the internal threads and drilled and tapped it to accept another ¼ inch barb with 1/8 inch pipe threads. The bottom barb is where the overflow tube from the radiator goes. The upper barb is the overflow and the vent for the coolant tank. |
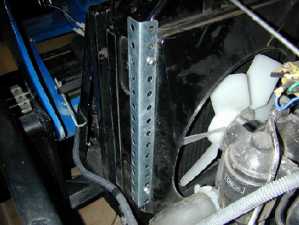
For a mount, I used standard "Punched" angle steel from my local ACE hardware store. I cut a piece 15 inches long and used the mounting screws for the fan shroud to hold the coolant tank mount in place. The stock screws are Metric and are 5mm but are too short. I replaced them with 5mm hex bolts which were 20mm long (Also from my local ACE hardware store). |
I used standard nylon "Wire ties" to hold the tank to the tank mount with the center one to an existing hole in the radiator side mount to pull the tank forward. I then ran the coolant overflow tube from the factory outlet on the radiator to the bottom barb on the coolant tank. I ran the tube behind the mounting angle piece to keep it out of harm's way. I then ran the overflow/vent tube for the coolant tank right down the side of the tank in a similar manner that the factory did with the original overflow tube. If you look closely, you can see the main overflow tube in the picture running from the radiator cap to the upper part of the tank mount. It is also just visible at the bottom of the tank (It has green coolant in it). The tank's overflow/vent tube runs down the front side of the tank. The top part of the tube is barely visible just in front of the upper nylon tie. I replaced the factory radiator cap with one for a 1994 Chevrolet pickup with a 5.7L V-8. It is a STANT #11331 and has 16lbs pressure (the factory cap is 15lbs). I have tested this system to just below 100 deg "C" and the materials I used to build it handled that temperature without any problems. This system worked for me because I removed the air intake from under the hood and because I have modified my hood to tilt forward. Standard automotive type systems will also work well, the decision on which type to use will depend on mounting preferences. As usual, if there are any questions or comments, feel free to email me: ranchsol@hotmail.com Norm. |