JINMA TAIL/BRAKE LIGHT UPGRADE By Norm S |

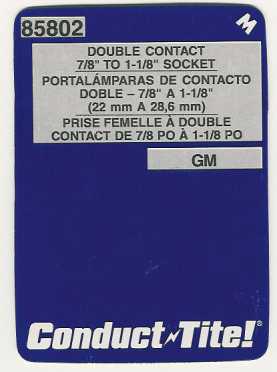
After some posts on the CTOA message board, I came to the realization that the factory tail/brake light sockets are not compatible with standard dual filament bulbs available in the US and Canada. The factory dual filament bulbs have pins that are directly opposite each other as in US standard single filament bulbs. The US standard dual filament bulbs have pins that are offset so that they can only be installed one way. The factory sockets make replacing bulbs difficult as a compatible bulb is not available at all auto parts stores. I set out to adapt a readily available replacement socket to the factory housing. After a bit of searching at a nearby auto parts store, I found a universal "GM" type dual filament socket that would fit openings from 7/8 inch to 1 1/8 inches. I purchased two at a "KRAGEN AUTO PARTS" store. (KRAGEN is a West Coast name. They are known elsewhere as Advance Auto Parts, Checker Auto Parts, Schuck's Auto Supply, and CSK Auto, Inc.) The sockets I purchase are part# 85802 - manufactured by Motormite . |
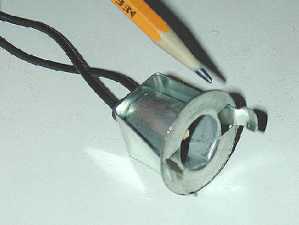
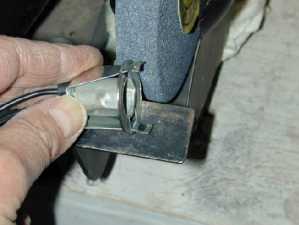
I found that the outside diameter of the universal socket is slightly larger than the short tube on the rear of the factory tail light housing (the socket fits inside of the short tube). There are two ways of dealing with this. One way is to remove the housing and cut off the factory mounting tube making a flat surface where the tail/brake light socket mounts. The other way is to grind down the socket outer diameter to fit inside of the tube (See picture with pencil pointing to the piece which needs to be ground). I chose the latter method because it was easier for me plus, I could still use the rubber seal from the factory socket. It was a simple matter of using my bench grinder to GENTLY remove material until I had the diameter correct (1/16 inch needs to be removed from the diameter). A word of caution here, there is one area on each side that does not have a lot of metal to spare so the best approach is to "Grind a little and measure a lot"!! |
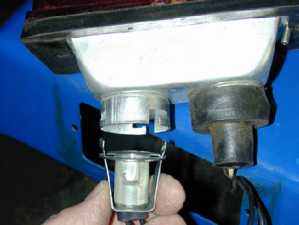
Once the diameter of the socket was ground to the correct size, it fit perfectly into the factory housing. I Installed the socket in the opening by squeezing the tension arms and sliding the socket into the opening then releasing the tension arms. All that was left was to get the correct wires attached. The universal socket has both wires as black so it is a matter of "Trial and error" to get the right wires connected. The easiest way to do this is to locate the taillight wire (#37 or #38). Once it is located, cut the wire. Now install a #1157 bulb in the socket and turn on the tail lights. Make sure the outside of the socket is grounded and then touch the taillight wire to one of the wires from the socket. If the dimmer filament of the 1157 bulb lights, you have the correct wire. If the brighter filament lights, you have the wrong one so touch it to the other wire. Once the correct tail light wire is located, permanently attach it to the socket wire then permanently connect the stop light wire (#23 or #24) to the other socket wire. (NOTE: If you want to retain the factory rubber seal, be sure to run the new socket wires through it before connecting them to the tail light/stop light wires.) This conversion can be done from under the fender so the housing does not have to be removed to accomplish it. I removed the housing so that it would be easier to photograph but removal was not required to complete this conversion. Also, obviously, replacing bulbs does not require removal of the whole lens assembly. It can be done from the rear as with the factory socket. If, for some reason, the universal socket cannot be located, this conversion can also be done using the standard "GM" type replacement socket (Part # 85819 [GM/Ford]). The difference is that the "Standard" type socket has several "Fingers" around the perimeter instead of the two fingers of the universal type. The "Fingers" of the standard socket must be gently bent inward so that they fit inside of the factory housing and snap into the opening in the housing. As with the "Universal" type socket that I used, the "Standard" type socket requires that 1/16 inch be ground off of the perimeter so that it will fit inside of the tube on the back of the housing. That's all there is to it. Now, when a bulb burns out, just replace it with a standard 1157 (or equivalent). If there are any questions or comments, email me at ranchsol@hotmail.com Norm S |